NHTSA Campaign Number: 17V438
Manufacturer BMW of North America, LLC
Components SUSPENSION
Potential Number of Units Affected 14,626
Fork Tube may Detach From Upper Triple Clamp
If the fork tube detaches from the sealing plug, the handling and stability of the motorcycle will be affected, increasing the risk of a crash.
Summary
BMW of North America, LLC (BMW) is recalling certain 2014-2017 BMW R1200GS and BMW R1200GS Adventure motorcycles.
The motorcycle fixed fork tube may separate from the pressed in seal plug that secures the tube to the upper triple clamp.
Remedy
BMW will notify owners, and dealers will add an additional fixed fork tube bush.
A fork that is sufficiently damaged will be replaced with a modified new part.
These repairs will be made free of charge.
The recall is expected to begin September 1, 2017.
Owners may contact BMW customer service at 1-800-525-7417.
Notes
Owners may also contact the National Highway Traffic Safety Administration Vehicle Safety Hotline at 1-888-327-4236 (TTY 1-800-424-9153), or go to www.safercar.gov.
Check if your BMW Motorcycle has a Recall
** Advance Notice of Recall **
Retrofit Fixed Fork Tube Bushing
R 1200 GS (K50, K50/11),
R 1200 GS Adventure (K51)
Service Information No. SI 31 002 17
Service Information No. SI 31 002 17
Retrofit Fixed Fork Tube Bushing
Details
As a result of ongoing field observations, BMW Motorrad has determined that the fixed fork tube (stanchion) of the R 1200 GS (K50, K50/11) and R 1200 GS Adventure (K51) can be damaged due to unusual incidents. Such high stress can be caused for example, when riding over an obstacle, during a fall or when driving through deep potholes. Resulting damage to the stanchion manifests itself through a gap between the stanchion and the press-fitted, top seal plug.
An inspection process along with a repair procedure has been developed. All affected motorcycles must receive one of the two repairs outlined in this bulletin.
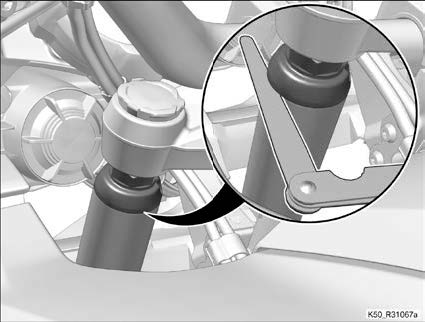
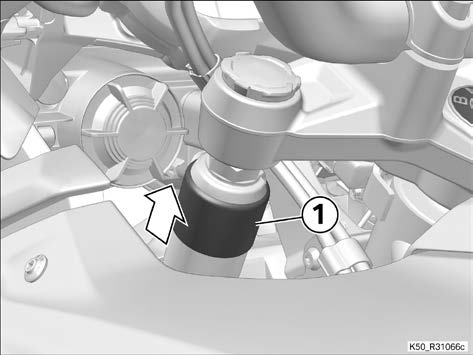
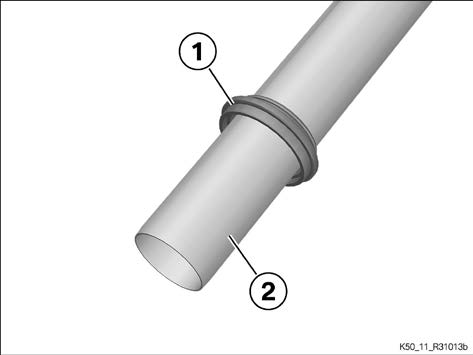
Figure 1: seal plug of the fixed fork tube (stanchion)
Note: for the inspection, the rubber grommet (not pictured) mounted at this location must be pushed down to view and measure any gaps.
Vehicles affected
In order to determine if a specific vehicle is affected by this Technical Campaign, it will be necessary to verify all vehicle VINs through a DCS Vehicle History Check. Based on the response of the system, either proceed with the repair or take no further action. Please note, affected VINs may not appear until 24-72 hours after the release of this bulletin.
NHTSA Statement
Please be reminded that it is a violation of federal law (The Safety Act) for you to sell, lease or deliver any new motor vehicle covered by this notification until the recall repair has been performed. This means that centers may not legally deliver new motor vehicles to consumers until they are fixed or use/sell replacement equipment/parts subject to this recall. Note also that substantial civil penalties apply to violations of the Safety Act.
Also, you should not sell, lease or deliver any Certified Pre-Owned or used vehicles subject to a safety recall until the repair is completed.
Please follow any special instructions that we provide to you for the return or disposition of recall parts.
Service Solution
Next time an affected vehicle is in the workshop, the fixed fork tubes (stanchion) are to be checked for possible preliminary damage according to the supplementary instructions 31 42 201 Checking the fixed fork tube. The resulting repair action is based on the result of the check of the individual stanchion and is to be taken from the following overview:
Retrofit Fixed Fork Tube Bushing
Exchange or repair of the fork tubes
REPAIR ONE: Gap of the individual fork tube is 0.0mm (no gap) or less than or equal to ≤ 0.2mm: Press-fit the fork tube bushing onto the existing fork tube.
REPAIR TWO: Gap of the individual fixed fork tube is greater than >0.2mm:
Press-fit the fixed fork tube bushing onto a new fork tube or replace with a fork tube that already has a press-fitted fork tube bushing.
- Fork tubes that are replaced must be stored until further notice. The stored parts must be labelled with the vehicle identification number and odometer reading.
See supplementary repair instructions;
- 00 60 317 Press on a fixed fork tube bushing
- 00 60 320 Retrofitting fixed fork tube with bushing
NOTICE
After completion of the repair, fixed fork tube bushes must be press-fitted on both fixed fork tubes.
Warranty processing
Defect code
| 00 00 31 30 00 | Retrofit fork tube with bushing |
| FRU number | |
| 00 60 320 | Retrofit fork tube with bushing, 8 FRUs |
| +00 60 672 | Additional labor for pressing fork tube bushings (if applicable) 1 FRU |
NOTICE
The flat rate unit number 00 60 672 (if applicable) has to be used for each pressed-on bush. The flat rate unit number 00 60 672 with 1 flat rate unit has to appear twice in the warranty claim.
*Main Work: These main labor operations include all repair procedures to complete the task with allowance for necessary ancillary tasks (e.g. visual inspection, lubrication, cleaning parts etc.) and administrative tasks. Only one main labor operation can be claimed per repair visit. All other labor operations for any other line(s) must be claimed using plus code labor opera- tions. Please refer to the Warranty Policy and Procedures Manual regarding add-ons, proper support, documentation, claims submission and archiving requirements as applicable.
Part numbers (invoice according to actually required parts)
| 31 42 8 566 596 | Fork tube – 1 per p/n – 2 required per motorcycles |
| 31 42 8 396 077 | Fork tube bushing – 1 per p/n – 2 required per motorcycles |
| 31 42 8 404 842 | Fork tube with press-fitted fork tube bushing – 1 per p/n – 2 required per motorcycles |
| 31 42 7 684 743 | Nut – 1 per p/n – 2 required per motorcycles |
| 31 42 7 674 776 | O-ring – 1 per p/n – 2 required per motorcycles |
If required, the sealing element set can also be billed.
| 31 42 8 532 723 | 1 set of sealing elements (for 2 fork tubes) |
Special Tool
| 83 30 2 456 223 | Mounting tool for fork bushings (31 1 561) |
Note: One Special Tool set 83 30 2 456 223 will be autoshipped to all dealers. This one tool set can be claimed one time per dealer by adding the part number to a single warranty claim related to this campaign.
Retrofit Fixed Fork Tube Bushing
Questions regarding this bulletin?
| For technical inquires in relation to this bulletin | Please contact the PuMA team |
| For warranty inquires in relation to this bulletin. | [email protected] |
| For parts inquires in relation to this bulletin | [email protected] |
| Motorcycle Service and Technical Manager | [email protected] |
| Bulletin authored/published by | [email protected] |
31 42 201 Checking the fixed fork tube
1
⇒Checking of fixed fork tube
NOTICE
During the check, the front wheel must be relieved completely.
Relieve the front wheel, e.g. brace the rear end of the vehicle downwards or lift vehicle with scissor-type lifter under the engine.
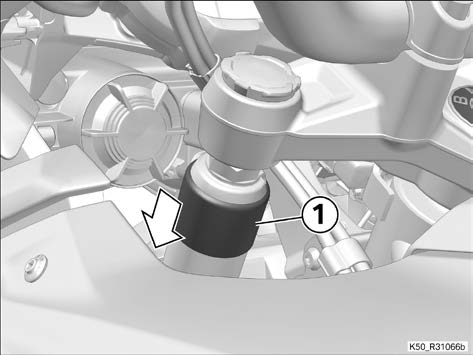
- Remove protective cap (1).
The description is for the left side of the vehicle.
The description also applies analogously to the right side of vehicle.
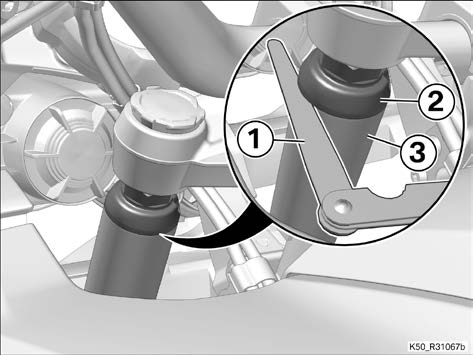
Check
- Check if there is a gap between the seal plug (2) and the fixed fork tube (3) using a feeler gauge (1) around the whole circumference.
- Perform the check on both fixed fork tubes.
| Technical data | |||
|---|---|---|---|
| Check of gap dimension with feeler gauge | Repair fixed fork tubes at | ≤0.2 mm | |
| Replace fixed fork tubes at | >0.2 mm | ||
Result
If a gap of ≤0.20 mm is present, the fixed fork tube must be repaired.
Measure
- Repair the fixed fork tube according to the repair manual (press-fit fixed fork tube bushing).
– 00 60 317 Press on a fixed fork tube bushing
– 00 60 320 Retrofitting fixed fork tube with bushing
Result
If a gap >0.20 mm is present, the fixed fork tube must be replaced.
Measure
A fixed fork tube bushing must be press-fitted onto a new fixed fork tube if required. See repair manual 00 60 317 Press-fitting a fixed fork tube bushing
- Replace the fixed fork tube according to the repair manual.
– 00 60 316 Checking and replacing fixed fork tubes
Result
The feeler gauge cannot be inserted onto both fixed fork tubes.
Measure
- A fixed fork tube bushing must be press-fitted on a fixed fork tube without any gap.
- Push protective cap (1).
⇐
2
⇒Follow-up work
- Final check of work performed
⇐
00 60 317 Press on a fixed fork tube bushing
1
Press-fitting fixed fork tube bushing on to existing fixed fork tube
- Remove the protective cap.
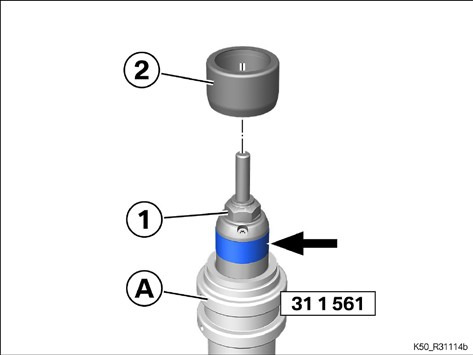
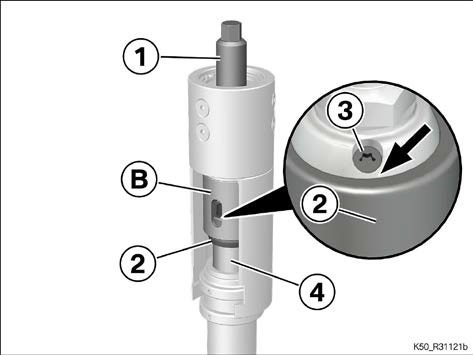
- Insert the fixed fork tube (1) into the counter support (A) (31 1 561). Tool position must be vertical.
- Lubricate the fixed fork tube (1) in the indicated area (arrow).
| Lubricant | |
|---|---|
| Acid-free friction-bearing grease | 81 22 9 407 174 |
- Press the fixed fork tube bushing (2) with taper towards the bottom onto the fixed fork tube (1).
- Fit the thrust piece (B), aligning the opening to the bleeder screw while doing so (arrows).
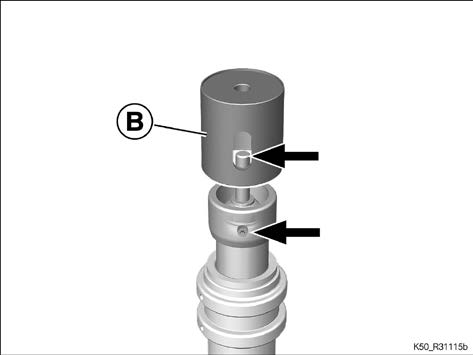
When fitting the thrust piece make sure to follow the repair instructions completely. Make sure the fixed fork tube is lubricated, the bushing is seated evenly and do not exceed 140nm. Do not use any air or other power tools with the special tool. Use the special tool vertically, do not lay the tool horizontally. Misuse of the tool or not following the repair instructions will result in damage to the tool and/or the stanchion and is not a warranty matter.
- Turn the spindle (1) towards the top and lubricate with the grease included with the tool.
- Insert the sleeve (C) onto the counter support while making sure that the guide is inserted to the limit position (arrows).
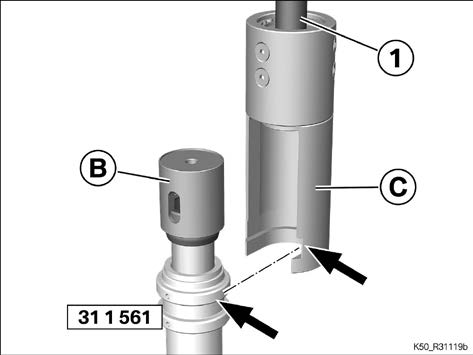
- Using the spindle (1) and the thrust piece (B) press-fit the fixed fork tube bushing (2) to the limit position or with tightening torque.
| Technical data | |||
|---|---|---|---|
| Tightening torque for sleeve (fixed fork tube bushing) | 140 Nm | ||
»Bleeder screw (3) must be completely free (arrow).
Check Result
The fixed fork tube bushing is not in the end position after press-fitting with tightening torque.
Measure
- Clean the fixed fork tube and the fixed fork tube bushing and repeat work with new parts.
- Loosen the spindle (1), remove tools.
- Clean the fixed fork tube (4).
⇐
00 60 320 Retrofitting fixed fork tube with bushing
1
⇒Checking fixed fork tubes
NOTICE
During the check, the front wheel must be relieved completely.
Relieve the front wheel, e.g. brace the rear end of the vehicle downwards or lift vehicle with scissor- type lifter under the engine.
- Perform check according to 31 42 201 Checking fixed fork tubes on both fixed fork tubes.
⇐
⇒Release and remove fixed fork tube from fork bridge
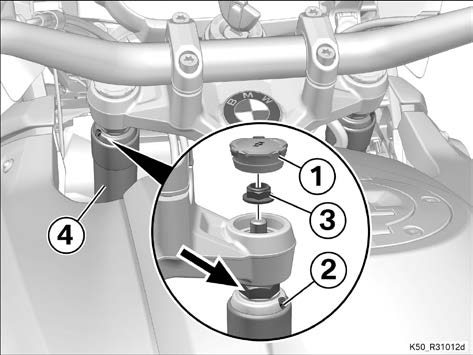
- Remove cover caps (1) with plastic wedge to avoid scratching the fork bridge.
- Remove screw plugs (2).
- Remove nuts (3), while counter-holding the hexagon head (arrow).
- Lower the fixed fork tube (4) slowly downwards.
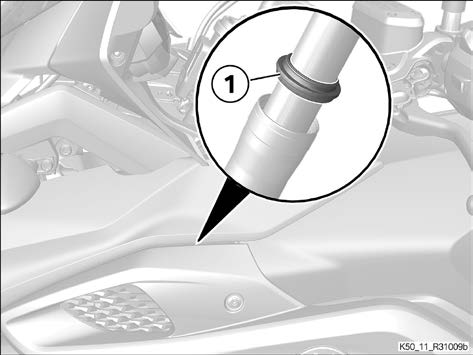
- Release dust boot (1) with plastic wedge.
- Check whether fork oil has accumulated under the dust boot (1).
NOTICE
If fork oil has accumulated under the dust boot, the sealing ring must be renewed.
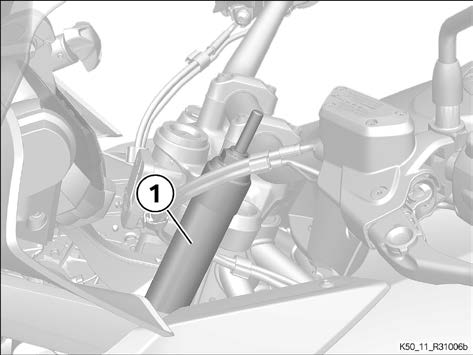
- Slightly swivel the fixed fork tube (1) and remove, draining off the residual oil in the slider tube.
- Remove the protective cap (2).
- Pull off the dust boot (1) from the fixed fork tube (2).
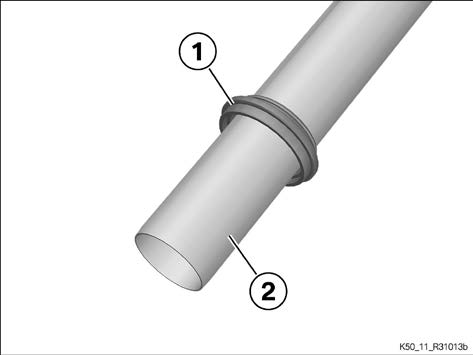
⇐
3
⇒Check sealing ring, renew it if necessary
- Check sealing lip (arrow) of sealing ring (1), renew sealing ring (1) if necessary.
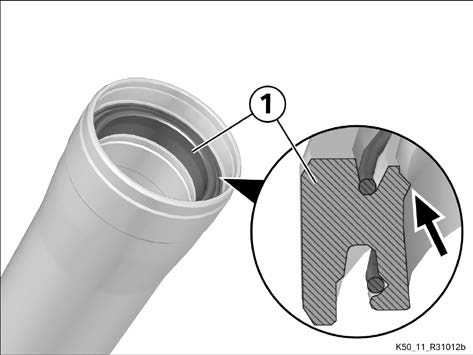
NOTICE
The set of sealing elements must be checked according to the instructions. The set of sealing elements may only be renewed in the case of damage.
- Pad a suitable leverage tool, e.g. slide a suitable petrol hose (1) onto the lever (11 6 721).
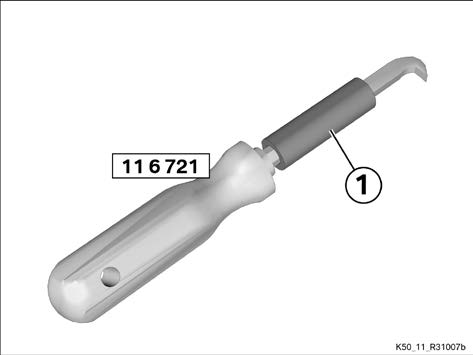
- Remove circlip (1).
ATTENTION
Use of hard or sharp-edged objects in proximity to component
Component damage
- Take care not to scratch components; cover or mask as necessary.
- Remove sealing ring (2) with lever (11 6 721).
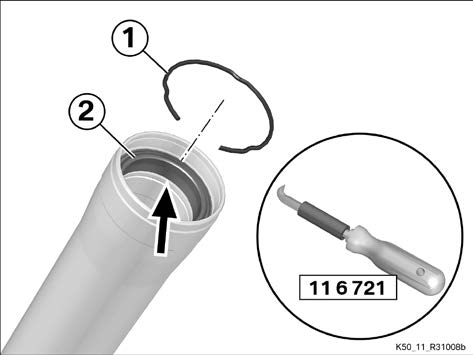
⇐
4
⇒Installing sealing ring if required
- Lubricate inside of new sealing ring slightly.
| Lubricant | |
| Unirex N3 | 83 19 2 160 349 |
- Slip new sealing ring into position with small recess (arrow) or labelling toward the dust boot.
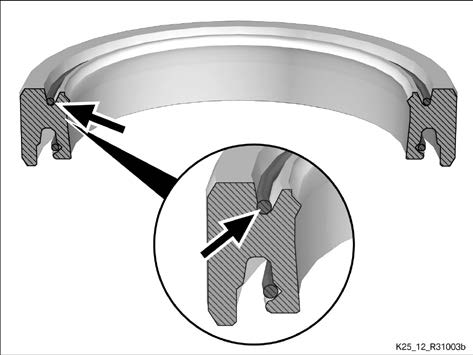
ATTENTION
Damage to the sealing lip due to use of incorrect tool
Damage to the sealing ring, oil leakage
- Subject sealing ring to load only at the outer circumference, do not press on the sealing lip.
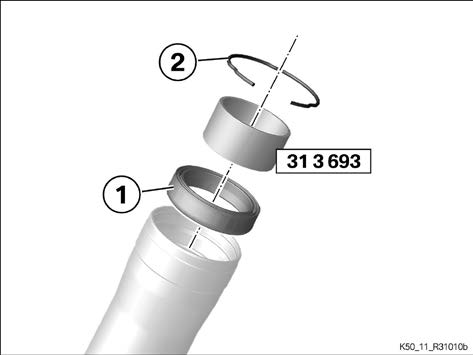
- Use the special tool specified in the repair manual.
- Install sealing ring (1) with impact bush (31 3 693) to limit position.
- Install circlip (2).
- Clean up fork oil in area (arrow) above the sealing ring (1).
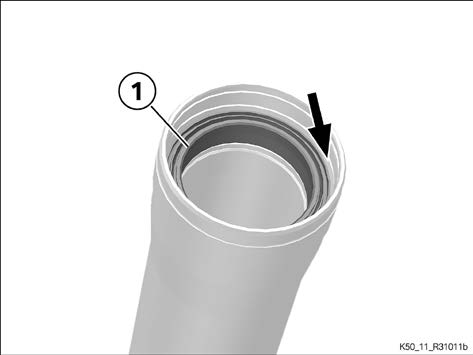
NOTICE
If there is fork oil between the sealing ring and the dust boot, it may lead to oil leakage in the fixed fork tube. Clean up fork oil in the space between the sealing ring and the dust boot.
⇐
5
⇒Installing left fixed fork tube and securing it in fork bridge
NOTICE
After completion of the repair, fixed fork tube bushings must be
press-fitted on both fixed fork tubes. If necessary, a fixed fork tube bush must also be press-fitted on a fixed fork tube without any gap.
- Do not install fixed fork tube with protective cap.
- Only install fixed fork tube with fixed fork tube bush.
- If necessary, fixed fork tube bushings must be pressed onto new fixed fork tubes according to the repair manual.
– Press-fit 00 60 317 fixed fork tube bushings
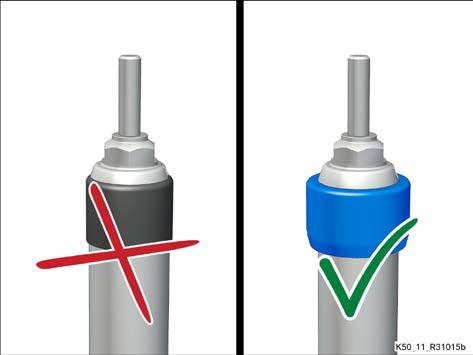
- Slightly lubricate the inner face of dust boot (1).
| Lubricant | |
|---|---|
| Molykote 111 | 11 00 7 660 832 |
- Slip dust boot (1) on to fixed fork tube (2).
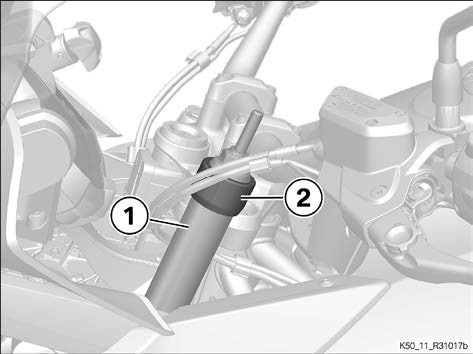
- Install fixed fork tube (1) with fixed fork tube bushing (2).
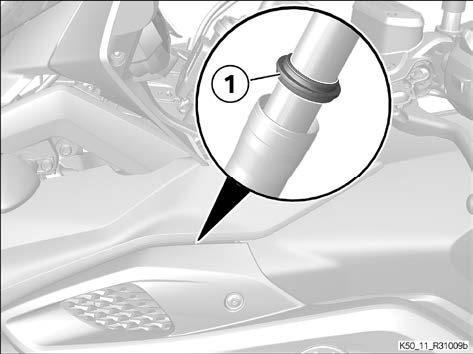
- Install dust boot (1).
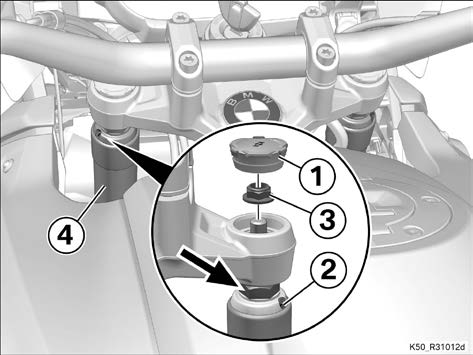
- Secure fixed fork tube (4) with new nut (3).
- Align fixed fork tube (4) so that the screw plug (2) faces out.
- Install nut (3), counter-holding at the hexagon head (arrow) while doing so.
| Tightening torques | ||
|---|---|---|
| Fork bridge, top, to fork fixed tube | ||
| M10 x 1.25, Replace nut
Thread-locking compound (mechanical) | 40 Nm | |
- Install cover cap (1).
- Carry out work on right fixed fork tube as well.
⇐
6
⇒Venting fork legs
NOTICE
After installation, the fork leg must be ventilated. Fork legs must be fully rebounded when ventilating, lift the front of the vehicle if necessary
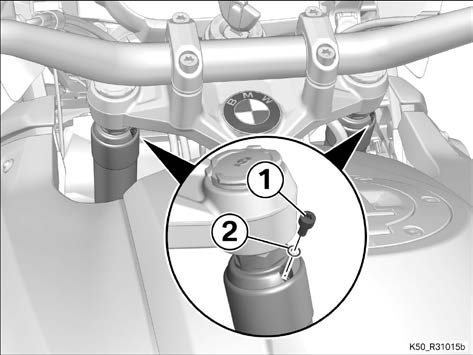
- Remove screw plugs (1).
- Dispose of the O-rings (2).
- Install screw plugs (1) with new O-rings (2).
| Tightening torques | ||
|---|---|---|
| Screw plug to seal plug | ||
| M4 x 8, Renewing O- ring | 2.5 Nm | |
⇐
7
⇒Final check of work performed
- Check the following:
– The work as performed achieved the intended purpose.
– All reservoirs and containers have been filled and all fluids and lubricants are at their correct levels.
– All threaded fasteners released beforehand have been correctly retightened.

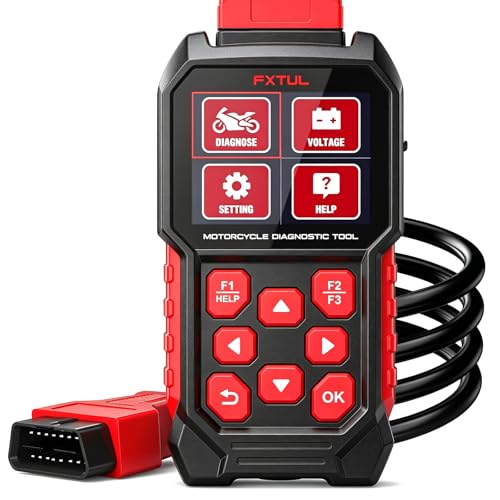
- Designed for Honda, Yamaha & Kawasaki Motorcycles: Supports dedicated diagnostic ports for Honda (4P), Kawasaki (4/6P), and Yamaha (2/3/4P). Also compatible with standard OBD-II motorcycles. Complete adapter cables included, Honda 4P adapter, Yamaha 2/3/4P adapter, Kawasaki 4-6P adapter, OBD-II main cable, and USB cable. If you‘re unsure about compatibility, please leave your motorcycle model and year in the Q&A section, we’ll confirm for you.
- One-Click Full System Motorcycle Scan: One-touch quick test auto scans all vehicle systems in seconds, including ECM (Engine Control Module), ABS, BODY (Body Control Module), IPC (Instrument Cluster), and IMMO (Immobilizer). This motorcycle diagnostic tool displays Pass/Fail status and stored fault codes instantly. Read and clear codes with ease, no professional training required beginner friendly.
- Advanced ECU Functions & Actuation Testing: Read/clear fault codes, view real-time live data streams (RPM, engine temp, manifold pressure, ignition timing), and capture freeze frame data. Perform actuator tests on fuel pump, cooling fan, fuel injectors, and solenoid valves. Supports idle speed adjustment and throttle position learning, handle common repairs at home without expensive dealer visits.
- Battery Voltage Test & Car Scan: Built-in battery voltage test monitors your motorcycle‘s battery health in real time via OBD port with waveform display. Features 2.8" color screen, shortcut keys, and 12+ languages. Includes OBD-II 16-pin connector for basic engine diagnostics on 2,000+ car models (engine only, no ABS/SRS).
- No Subscription & 3-Year Warranty: Lifetime free USB updates, unlimited VIN entries for multi-vehicle diagnostics, no subscription fees. Ever. We continuously improve our tools to ensure future-proof compatibility with new motorcycle models and enhanced features. Backed by a 3-year warranty for complete peace of mind. Your trusted motorcycle code reader and OBD2 scanner for every ride.
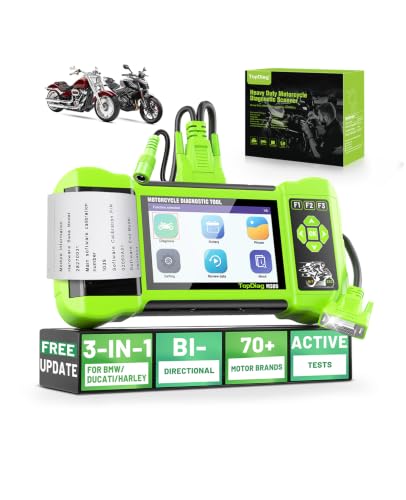
- [Full System Diagnostics] M300 professional scan tool can request information from motorcycle or send commands to the autocycle modules. It allows the technician to perform factory service procedures such as ABS system test, Freezing data, Actuator testing, DTC enquiry, Troubleshooting, CO idle speed adjustment, Adjusting the throttle valve position sensor(TPS)
- [17+ Services] M300 Diagnostic Scanner Tool is designed for home mechanics and workshops, garages. Support almost all the most popular functions of motorcycles, including Engine, ABS, TPMS, Suspensions, Ignition, EPS, Traction control, Radio, LED headlight. Battery detection, Start test, Charging test, etc. Help you handle all kinds of complex maintenance problems easily.
- [With Print Function] The tester is equipped with a built-in printer that can generate printed test reports. These reports typically include the battery test results, including voltage, CCA, SOC, and any additional measurements or diagnostic information. The printed report serves as documentation and can be used for reference or for sharing the results with customers or technicians.
- [Battery Tester] Allows you to assess motorcycle battery health and performance.Voltage measurement, include charging test, start test. By performing a battery test using a motorcycle diagnostic tool, you can identify any battery-related problems early on and take appropriate action.
- [Wide Compatibility] Support the diagnosis of Asian, European and American multi-brand motorcycles, Supports 9 languages, M300 Motocycle diagnostic tool Support Turkic,Spanish,Thai,French,English,Vietnamese,Portuguese, Indonesia,German.
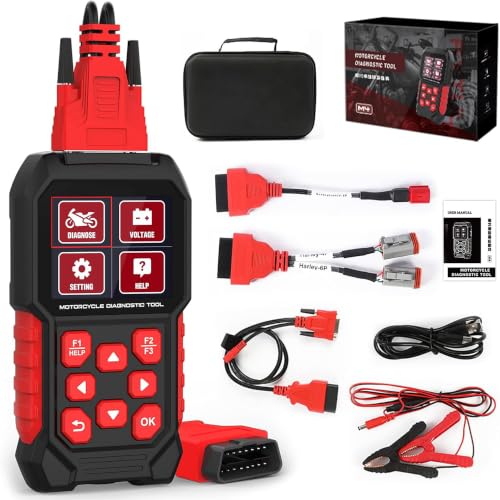
- Harley-specific compatibility: Designed only for compatible Harley-Davidson motorcycles with a round 4-pin or 6-pin diagnostic port; verify the connector, model year and required function before purchase
- Full-system diagnostics: Read and clear supported fault codes, view live data and ECU information, and access available systems; coverage varies by motorcycle model, year and ECU
- Resets, active tests and ABS bleeding: Perform supported service resets, active tests and adjustments; ABS bleeding is available on compatible models through 2023 only and unavailable for 2024 or newer models
- Two cables, different functions: Use the Harley 4P/6P cable for supported motorcycle diagnostics, resets, tests and ABS bleeding; the OBD2 16P cable supports basic car engine code reading, clearing and live data only
- Standalone multilingual operation: Use the 2.8-inch display in 17 selectable languages; the tool has no internal battery and requires 12 V bike power; update with the official package and a FAT32 SD card without disconnecting power
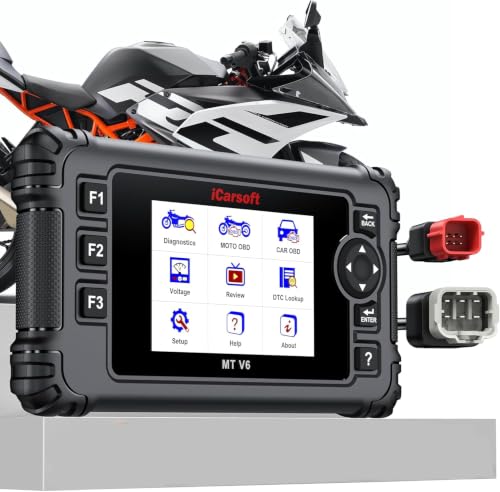
- 【MAKE EASIER MAINTENANCE For KTM! KEEP MOTORCYCLE DRIVE GREAT!】iCarsoft MT V6 OBD scanner for KTM motorcycles has truly achieved comprehensive diagnostic and maintenance of motorcycles, with full Actuation test MAINTENANCE for KTM motorbike, commonly used reset services of motor maintenance, making motor mantenance easy. IMPORTANT REMINDER: THE DIAGNOSABLE SYSTEMS/AVAILABLE FUNCTIONS MAY VARY DEPENDING ON THE ECU-CONTROL MODULE: FOR EXAMPLE, EXC 150I (ENDURO (2020-2021)) ONLY ALLOWS DIAGNOSIS OF THE ENGINE SYSTEM, WITH ONLY TWO RESET SERVICES: "RESET ALL ADAPTATION VALUES" & "RESET THROTTLE ADAPTATION VALUES". WE SUGGEST OBTAINING THE SERVICE LIST APPLICABLE TO YOUR MOTORCYCLE FROM US FIRST.
- 【ALL SYSTEMS DIAGNOSTIC 】 iCarsoft motorcycle in-depth scanner diagnostic tool do all systems diagnosis with full ECU of Yamaha motorcycle- ABS, Communication Control, Cornering Light Control, Electric Power Steering, Suspension, Transmission system moduls and more. Pulling ECU info and operating deeper layer functions or services,locating system faults (ALL SYSTEMS MEANS THAT IT CAN SCAN ALL THE SYSTEMS OF YOUR MOTORCYCLE MODEL, BECAUSE EVERY MOTORCYCLE HAS DIFFERENT QUANLITY OF CONTROL SYSTEMS)
- 【ACTUATION TEST】iCarsoft MT V6 motor scanner for KTM motorcycle can help you quickly determine whether a specific system, subsystem, or component is functioning properly. The test function allows you to directly control or test such as Intake air pressure, AI solenoid valve,ABS and more to easily diagnose out the fault or potential faults and provide you the best maintenance solution to keep motor always drive well
- 【ESSENTIAL SPECIAL SERVICES, EASIER& PROFESSIONAL DIY MAINTENANCE】 The motorcycle diagnostic tool provides most common services-Oil Reset, Electronic Throttle (ETC) Reset,ABS Bleeding,Electronic Suspension Calibrate, VIN. iCarsoft motorcycle OBD2 scanner makes DIY motor maintenance easier and professional, save you 1000+ in maintenance costs. (*some services depend on model)
- 【FULL MOTOCYCLE OBD DIAGNOSTIC】It supports all motorcycle OBD for KTM motorcycle-such as read current fault code, read pending fault code, read permanent fault code, erase fault code, read live data, read freeze frame, read vehicle information, read IM readiness, read oxygen sensor data, read on-board monitor data and trigger evaporation system leakage test
- Full System Diagnostics for BMW Motorcycles: Specifically designed as a BMW motorcycle scanner with 10-pin, compatible with BMW C, F, G, K, R, S, and HP series motorcycles. Performs full system diagnostics including Engine, ABS, TPMS, IMMO, Body Control, and Instrument Cluster, with one-touch QuickTest to read and clear fault codes quickly and efficiently
- BMW Advanced Reset & Maintenance: Supports advanced BMW service functions including ECU reset, ABS bleeding, throttle valve reset, idle actuator calibration, electronic traction control reset, gear position adaptation, service reset, control module reset, windscreen calibration, and emergency call service reset. Unlock dealership-level maintenance at home
- ABS Bleeding & Advanced Actuation Tests: Allows ABS pump activation for complete brake fluid bleeding and safety system maintenance. Supports actuator tests for fuel pump, cooling fan, relays, and electronic components for BMW motorcycle brake service and system troubleshooting
- Dual Battery Voltage Test & 17 Language: Performs battery voltage testing via diagnostic port or battery clamps, with real-time waveform, max/min recording, and 3.2-inch color TFT display. Features shockproof casing, shortcut function keys, and support for 17 languages for global riders and professional mechanics
- No subscription required, 3-Year Warranty & No VIN Limits: Includes main unit, 10-pin & 16-pin cables, battery clamps, Type-C cable, storage bag, and manual. No VIN restrictions. Backed by 3-year warranty and lifetime software updates. Also reads basic engine codes on OBD2-compliant vehicles.
This product presentation was made with AAWP plugin.